I bought a 1962 Chevy C10 with a 350 that turned out to have very low oil pressure and very high operating temperature. (The "good" side of both the oil pressure and temperature lights turned out to be wired direct to the ignition - lesson learned). Now there were some things I could have tried to improve the cooling system, such as get the fan closer to the radiator and/or fully shroud it, but it was running 230-240 degrees even at cruising speed. This seemed like the original radiator from when the truck had a much smaller straight 6 engine, so it is undersized for the V8 and I'm in Florida. So all that coupled with my intent to swap the engine, and it seemed like a good opportunity to upgrade the cooling system.
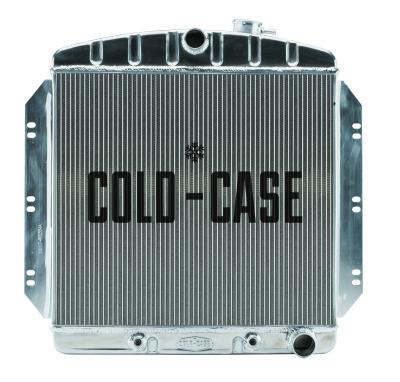
I went on a search for a decent replacement. Wow they are expensive. And the aluminum ones available look like they belong in a race car, not a classic truck. Then I found ColdCase. I really likes the stamped tanks that give it a look that fits better in a classic vehicle, and the price is reasonable. Eric from Cold Case also explained to me that I could wipe the tank with denatured alcohol then spray it with Eastwood radiator gloss spray if I really want it to blend in.
The radiator arrived in an attractive box and was well protected with styrofoam packing material. I first Took it out to measure the mounting dimensions and it seemed like they were right so I got right to removing the old radiator and attached trans cooler. Once I got the old radiator out I laid them side by side and took more detailed measurements. Again, all looks good.
I also did a test fit of the radiator, and it seemed to fit very well, with the exception of a collision at the bottom with a body part. I am not sure what it is called but it is like a front roll pan, between the grille and the bumper. I think it also serves as a bit of an outer shroud, preventing air (and road debris) from coming at the front of the radiator from underneath. so in that sense it probably should be snug against the radiator but it happened to hit right at the weld joint of the bottom tank, which exaggerated the conflict. So I planned to try to see if the body part could be adjusted out, or if I needed to grind it back. And that's when my new engine arrived, so I would have to come back to this project. I had however decided to go with the aluminum shroud and electric Fan so I called up Cold Case and got them on order so I would have them after I swapped the engine.
Fast forward a few work days and I'm back on the cooling system project. I discovered that the body part preventing flush fit was held in place by two brackets that were adjustable on both ends, plus two more bolts in slotted holes outside the framerail. So this turned into a simple exercise of loosening the bolts and shifting the body part (with the help of a pry bar) so it did not extend into the engine compartment past the radiator mount. Tighten the bolts back up and move on.
Bottom line at this point is that the radiator turned out to be a perfect fit with some minor adjustment of a body part. In the meantime the aluminum shroud and electric fan had arrived so it was time to unbox those.
The shroud fit nice and flush on the radiator. I would have preferred for it to have predrilled holes to match those in the radiator, but with a sharpie, a drill, a dremel (to make the hole oblong) and a deburrer it was easy to get the holes I needed.
Now there were no mounting directions with the fan, only wiring directions so I was confused what I should be doing with the straight zip fasteners and the springs. Some texting with a friend and I figured out those were for mounting the fan direct to the radiator, something I did not intend to do, so I set them aside after some time lost on the investigation.
Another thing about the fan is that while the wiring directions are easy enough to follow, the harness is not without issues. The package contained two of the smaller harness with the black and red wires that go to ground and to the relay, respectively. The trouble was the red wire had a crimped-on ring connector that would be more suited to going to ground, and the black wire had a straight crimp connector with an open end more suited to connect to a wire going to the relay. Simple enough to cut off the terminals but again, unnecessary time wasted. The other thing about this same harness is the connector to the fan wires. it has two flat terminals arranged perpendicular to each other, where the vertical connector is not centered like a "T", rather offset like an "L". But the female side is offset in the wrong direction. I was able to carefully (and with a bit of force) get them to connect together but this was the second case, at the other end of the same harness, where things are exactly 180 degrees wrong. The relay Itself was simple enough to mount to the top radiator bolt near the battery after enlarging the mounting hole. The rest of the wiring went fine as per the wiring directions.
I also installed a 13 inch by 2 inch cylindrical overflow tank. Now since this vehicle has the battery right next to the radiator on the passenger side, the tank needed to mount on the driver side. This is when I noticed my first and only problem with the radiator itself. The filler neck is offset to the passenger side and the overflow fitting points toward the battery. It seems for this application that these would more appropriately be placed towards the driver side. Rather than run a hose across the top of the radiator I routed it down the passenger side, along the bottom of the radiator and up to the overflow tank. I hope this works. Also the fitting on the overflow tank (not a Cold Case product, to be clear) is 1/4" while the overflow fitting is 3/8". A tour of the local auto parts and hardware stores produced no replacement overflow fitting, and also no reducer so I went with a somewhat clumsy but functional solution of two brass fittings screwed together, one with a 1/4" barb and one with a 3/8" barb.


